Pruning vines: Build up the first 3 years and then maintain
Introduction to pruning grapevines
Pruning a vineyard is not the same as pruning table grapes. For table grapes, we speak of winter pruning and summer pruning. Pruning wine grapes involves soft pruning (during the winter) and foliage management during the growing season. Proper pruning of vines is crucial if you want to enjoy your vineyard for decades.
In this article, I'll explore the concept of pruning grapevines during the first three years. Why should we restrict a vine 's growth in this tender stage, and how to prune it? When pruning grapevines, the timing is crucial. The common thread during the first three years is that you shouldn't be greedy or impatient. "You can't hurry love, you'll just have to wait," Phil Collins sang. And he was right.
Why prune grapevines?
In the first three years, the reasons why we prune are focused on the future, but from the fourth year onwards, we often prune based on the current year or the year to come.
I already wrote about this in my article " Starting a Vineyard: Some Principles Before Starting a Vineyard ." Let your plant grow according to the maturity of your vine, or in other words: "During the first few years, let your plant work for your root system, instead of your root system working for your plant."
In the first few years, it's in your best interest for your plant's root system to expand well. This allows your vines to access water and nutrients more easily. Grapes are among the fruits with the highest sugar content per volume. Therefore, the vine must perform at an Olympic-level every year to produce ripe fruit. A limited root system puts your plant under stress, and the growth process is far from optimal. If the ratio of root system to vegetation is too small, your vines are also at risk of dying during droughts.

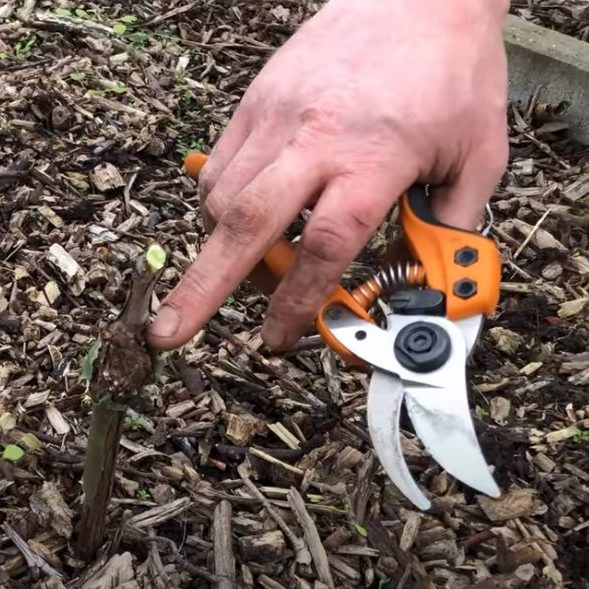
This Regent vine is in its third year. I'm leaving four shoots, with a mature plant having 6 to 8 on the fruiting vine and another 2 on the renewing vine.
How should you prune your grapes during the first few years?
Year 1: Pruning your vines in the first year
In the article " Planting a Vineyard: How to Get Started in Practice? " you can read how to plant your vines in your vineyard. But the work doesn't stop there. You have to guide the plant until it becomes a productive plant that will yield grapes for decades. The goal in the first year is to tie up the thickest possible shoot.
The wax layer and any shoots from the nursery
When planting out, we often don't have any suckers yet, and the rootstock with the graft is dipped in a layer of wax. Some vines are sold with the previous year's suckers still attached. In this case, cut them back to one or two buds. If you have a vine with a waxy coating around the graft, you shouldn't remove it. The grafts grow right through the waxy layer, and as your vine grows, the waxy layer will naturally fall off. Also, be sure to keep an eye on the weather forecast. Protect your vines with shoots from frost with fleece. You can also postpone planting until after the Ice Saints have passed (after May 15th).

source: André Meyermans from Scherpenheuvel, former teacher at the horticultural school in Leuven.
Choosing the best shoot in two selections
In the image above (middle drawing), you can see that you can let multiple shoots grow. I make two selections of the shoots: once when they're about 10-20 cm long, and a final selection when they're 40-50 cm long.
- During the first selection in May, depending on the season (when the shoots are 10-20 cm), I remove any shoots that are too small and/or growing in the wrong direction. I keep the two best ones. I don't tie them up yet, as the shoots are still very susceptible to breaking.
- During the second selection, I select the best runner. This isn't always the largest or thickest runner; I often choose the one that's best positioned towards the top. I tie it down when it's about 40-50 cm long. If you have to bend it too far, you might want to use a temporary stake a little further along the plant to reduce the need for bending. Important tip: Tie down the best runner first and only remove the second-best one after a week. If your best runner is still in top form, only remove the second runner.

Pruning vines in year 1 - I choose the two best shoots from this Regent cane when they are 10 to 20 cm long and tie them down with my Min Max pliers. I removed the other weaker shoots, which you can see in the lower left corner of the photo.
Pruning vines year 1: What do we do with the best shoot?
We tie the best shoot to our plant stake; two or three points is fine. I use a min-max pliers for this. You can also use a vigne-fix rubber seal or some tying tube. I think the min-max pliers are a great investment. Let all the leaves on your shoot grow; that helps the stem thicken. For the remainder of the year, we continue tying in the runner until we top it off in mid-July at a height of 1.5 meters. If your runner reaches a height of 1.5 meters earlier in the year, top it off as well. Remove all tendrils and any bunches on the runner. Cut off the axillary shoots or suckers (the shoots that emerge between the trunk and a leaf on the runner) after one leaf. If your shoot is pencil-thin by mid-July, it's best to cut it back to two buds from the base after the winter. The shoot will never be strong enough to grow well in the coming years. It's better to lose a year on this stock.
Year 2: Prune back to shape your trunk (March)

source: André Meyermans from Scherpenheuvel, former teacher at the horticultural school in Leuven. If your shoot is thinner than a pencil, cut it back to two buds and repeat year one. If your shoot from the first year is thicker than a pencil, you can cut it back to 60 cm. This is your final trunk. It's on this trunk that the magic happens. There are two parts to the trunk:
- The two top buds: Here you let the two shoots grow. Tie them to your wires and top them off at 2 meters. Remove all emerging bunches and tendrils. Prune the side shoots that emerge from these two shoots to 2 leaves.
- Prune the shoots from the other eyes on your trunk (the lower shoots) to 2 leaves, and remove the suckers emerging from the axils of those leaves.
Year 3: The two branches: one for this year, one for the future (March)
Great, you now have two healthy shoots from last year that are about 2 meters tall. And of course, you also have the trunk.
- Now prune the tallest shoot from last year, emerging from the top eye, back to 110 cm above the ground and tie it to the lowest wire. This will produce grapes in year three (a little happy dance)!
- Prune the other offshoot from last year, the lowest of the two on the trunk, back to 2 buds.
- Now remove all new shoots from the trunk. This is also called trunk cleaning.
The highest shoot is the fruit bearer
The tallest shoot from last year, which you tied to the bottom wire, will produce a new shoot from each eye. Each shoot will produce one or two bunches. It's best to remove the third bunch. I would only leave six shoots; the plant is still young, and we don't want to overload it.
The lowest offshoot is the innovator
You pruned the second (lower) shoot back to two buds and it's there for next year. That's why it's called the "renewer"; it will produce two shoots this year. One to tie to your first wire next year, and another to renew the shoots and prune back to two buds. This will continue in a Guyot Simple system. Tip: It's best to leave only one bunch on the shoots from this shortened cane. Cut the rest away at the beginning of the season. This will make these shoots stronger.

source: André Meyermans from Scherpenheuvel, former teacher at the horticultural school in Leuven.
Pruning grapevines: year four and beyond (March)

Year 4 is a first full-fledged wine year, production capacity is not yet at its peak but is already at 70-80% As you can see in the image, you can now remove the trunk with the fruiting and suckers from last year (see "Pruning away a branch" in the image). You do this in March so that the energy from all the branches can flow back to the trunk during the winter. Now you apply the same principle as in year 3: tie the highest sucker on the new shoot to the first wire. The second sucker from last year is pruned back to two buds. This is the principle that is used every year in Guyot Simple pruning, the most recommended pruning method for hobby viticulture. I will also explain the Cordon pruning method later on this website. You can always shred pruning waste and distribute it back among your plants as mulch. Do not incorporate it, just place it on the ground in the brown zone of your vineyard.

pruning vines - in mid-June I already top off the first shoots
Finally, about pruning vines
So, that's all I know about pruning vines in the first four years in your vineyard. If you have any tips, questions, or comments, please feel free to leave a comment below. Together, we can learn a lot about the vineyard. If you find the information on this site valuable, consider purchasing your vineyard products and winemaking supplies from the website's online store . This way, we can provide even more content in the form of articles and videos on my playlist " Tom's Vineyard on YouTube ." Best of luck with your vineyard, and I hope you enjoy a glass of homemade wine soon. Warm regards, Tom


1 comment
Bonjour, kunt u de snoeiplekken in ue tekenwerk met rood aangeven svp, dan is het leesbaarder Merci..